Cranberry & Goat Cheese Tart

I was invited to an outdoor potluck picnic in the Santa Cruz mountains a couple of weeks ago. The spot was so beautiful and rustic with tall trees and an ocean view in the distance. Gorgeous!

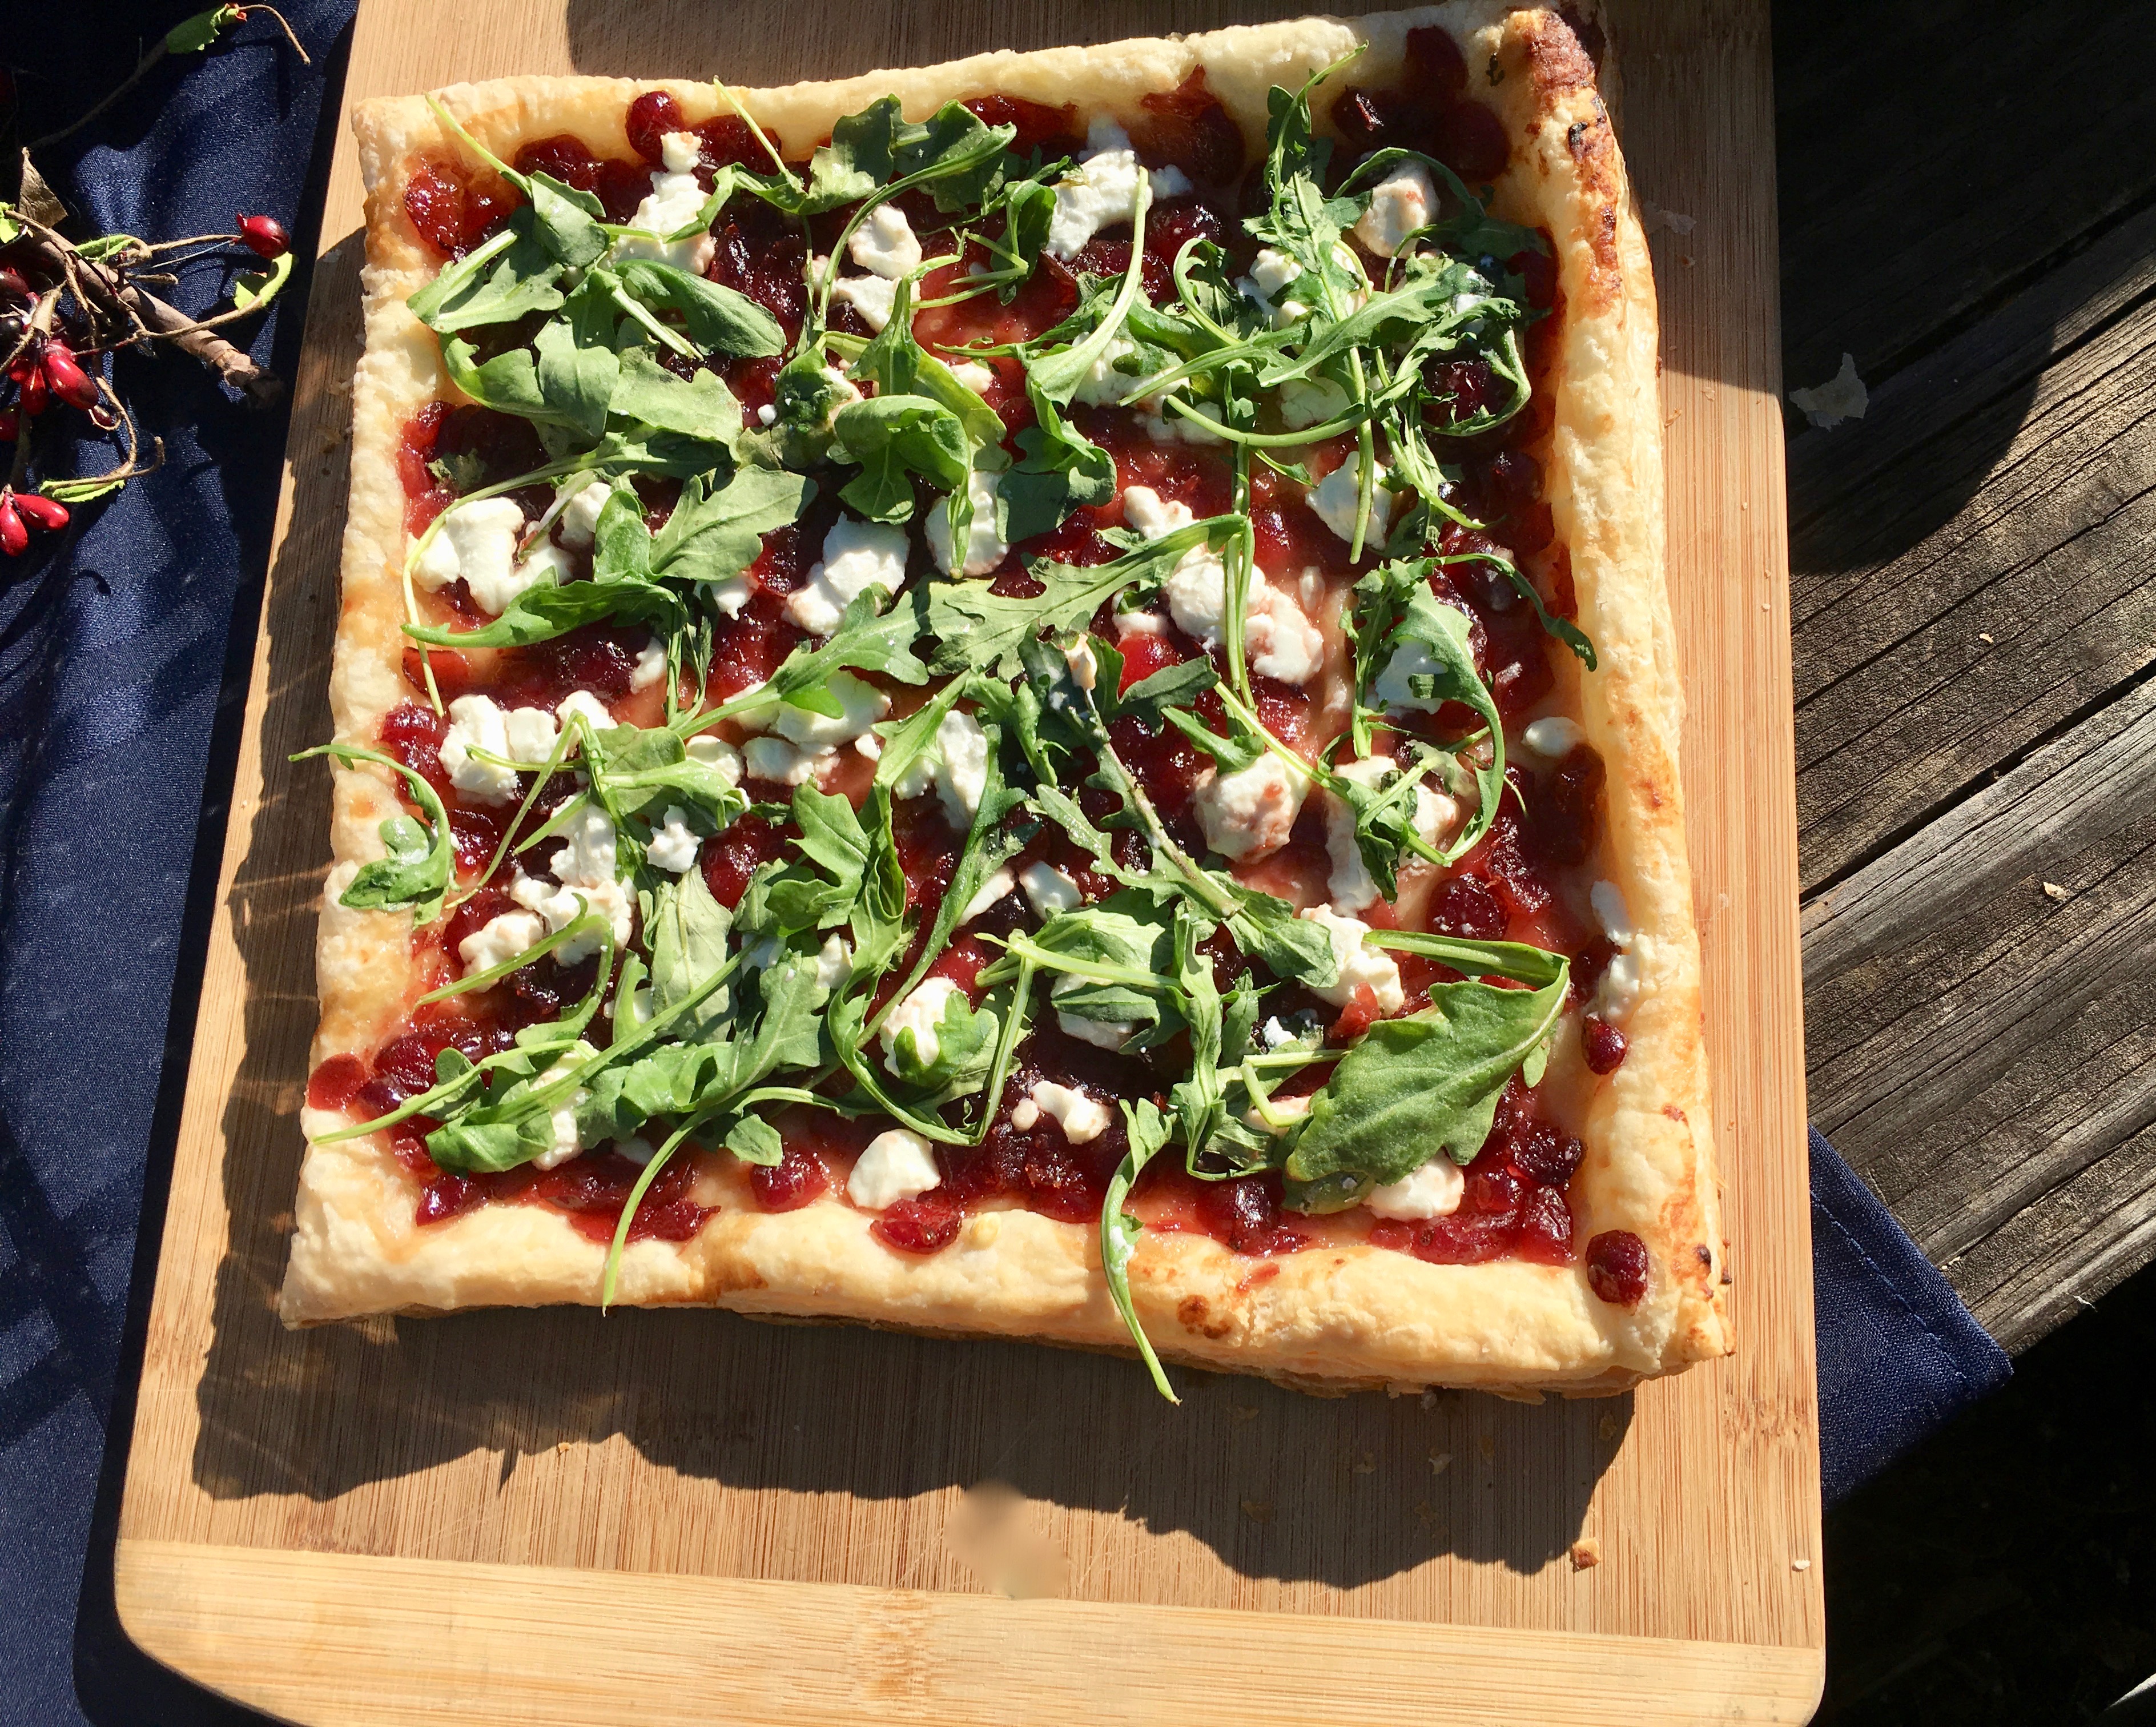
I wanted to bring something delicious of course, but also something to match the rustic atmosphere. Also I didn’t want something that needed to be heated or kept cold. So I looked in my refrigerator to see what I had on hand and decided on this cranberry and goat cheese tart.

The flavor combinations of this tart are so complex – sweet from the cranberry chutney, tangy from the goat cheese, and peppery from the arugula on a crispy, flaky puff pasty dough – it’s hard to believe how easy it is to make. And with only 4 ingredients! (If you don’t count the flour for the work surface.)

Serves: 4-6 as an appetizer

Difficulty Level: So easy

Ingredients

  • 1 sheet puff pastry
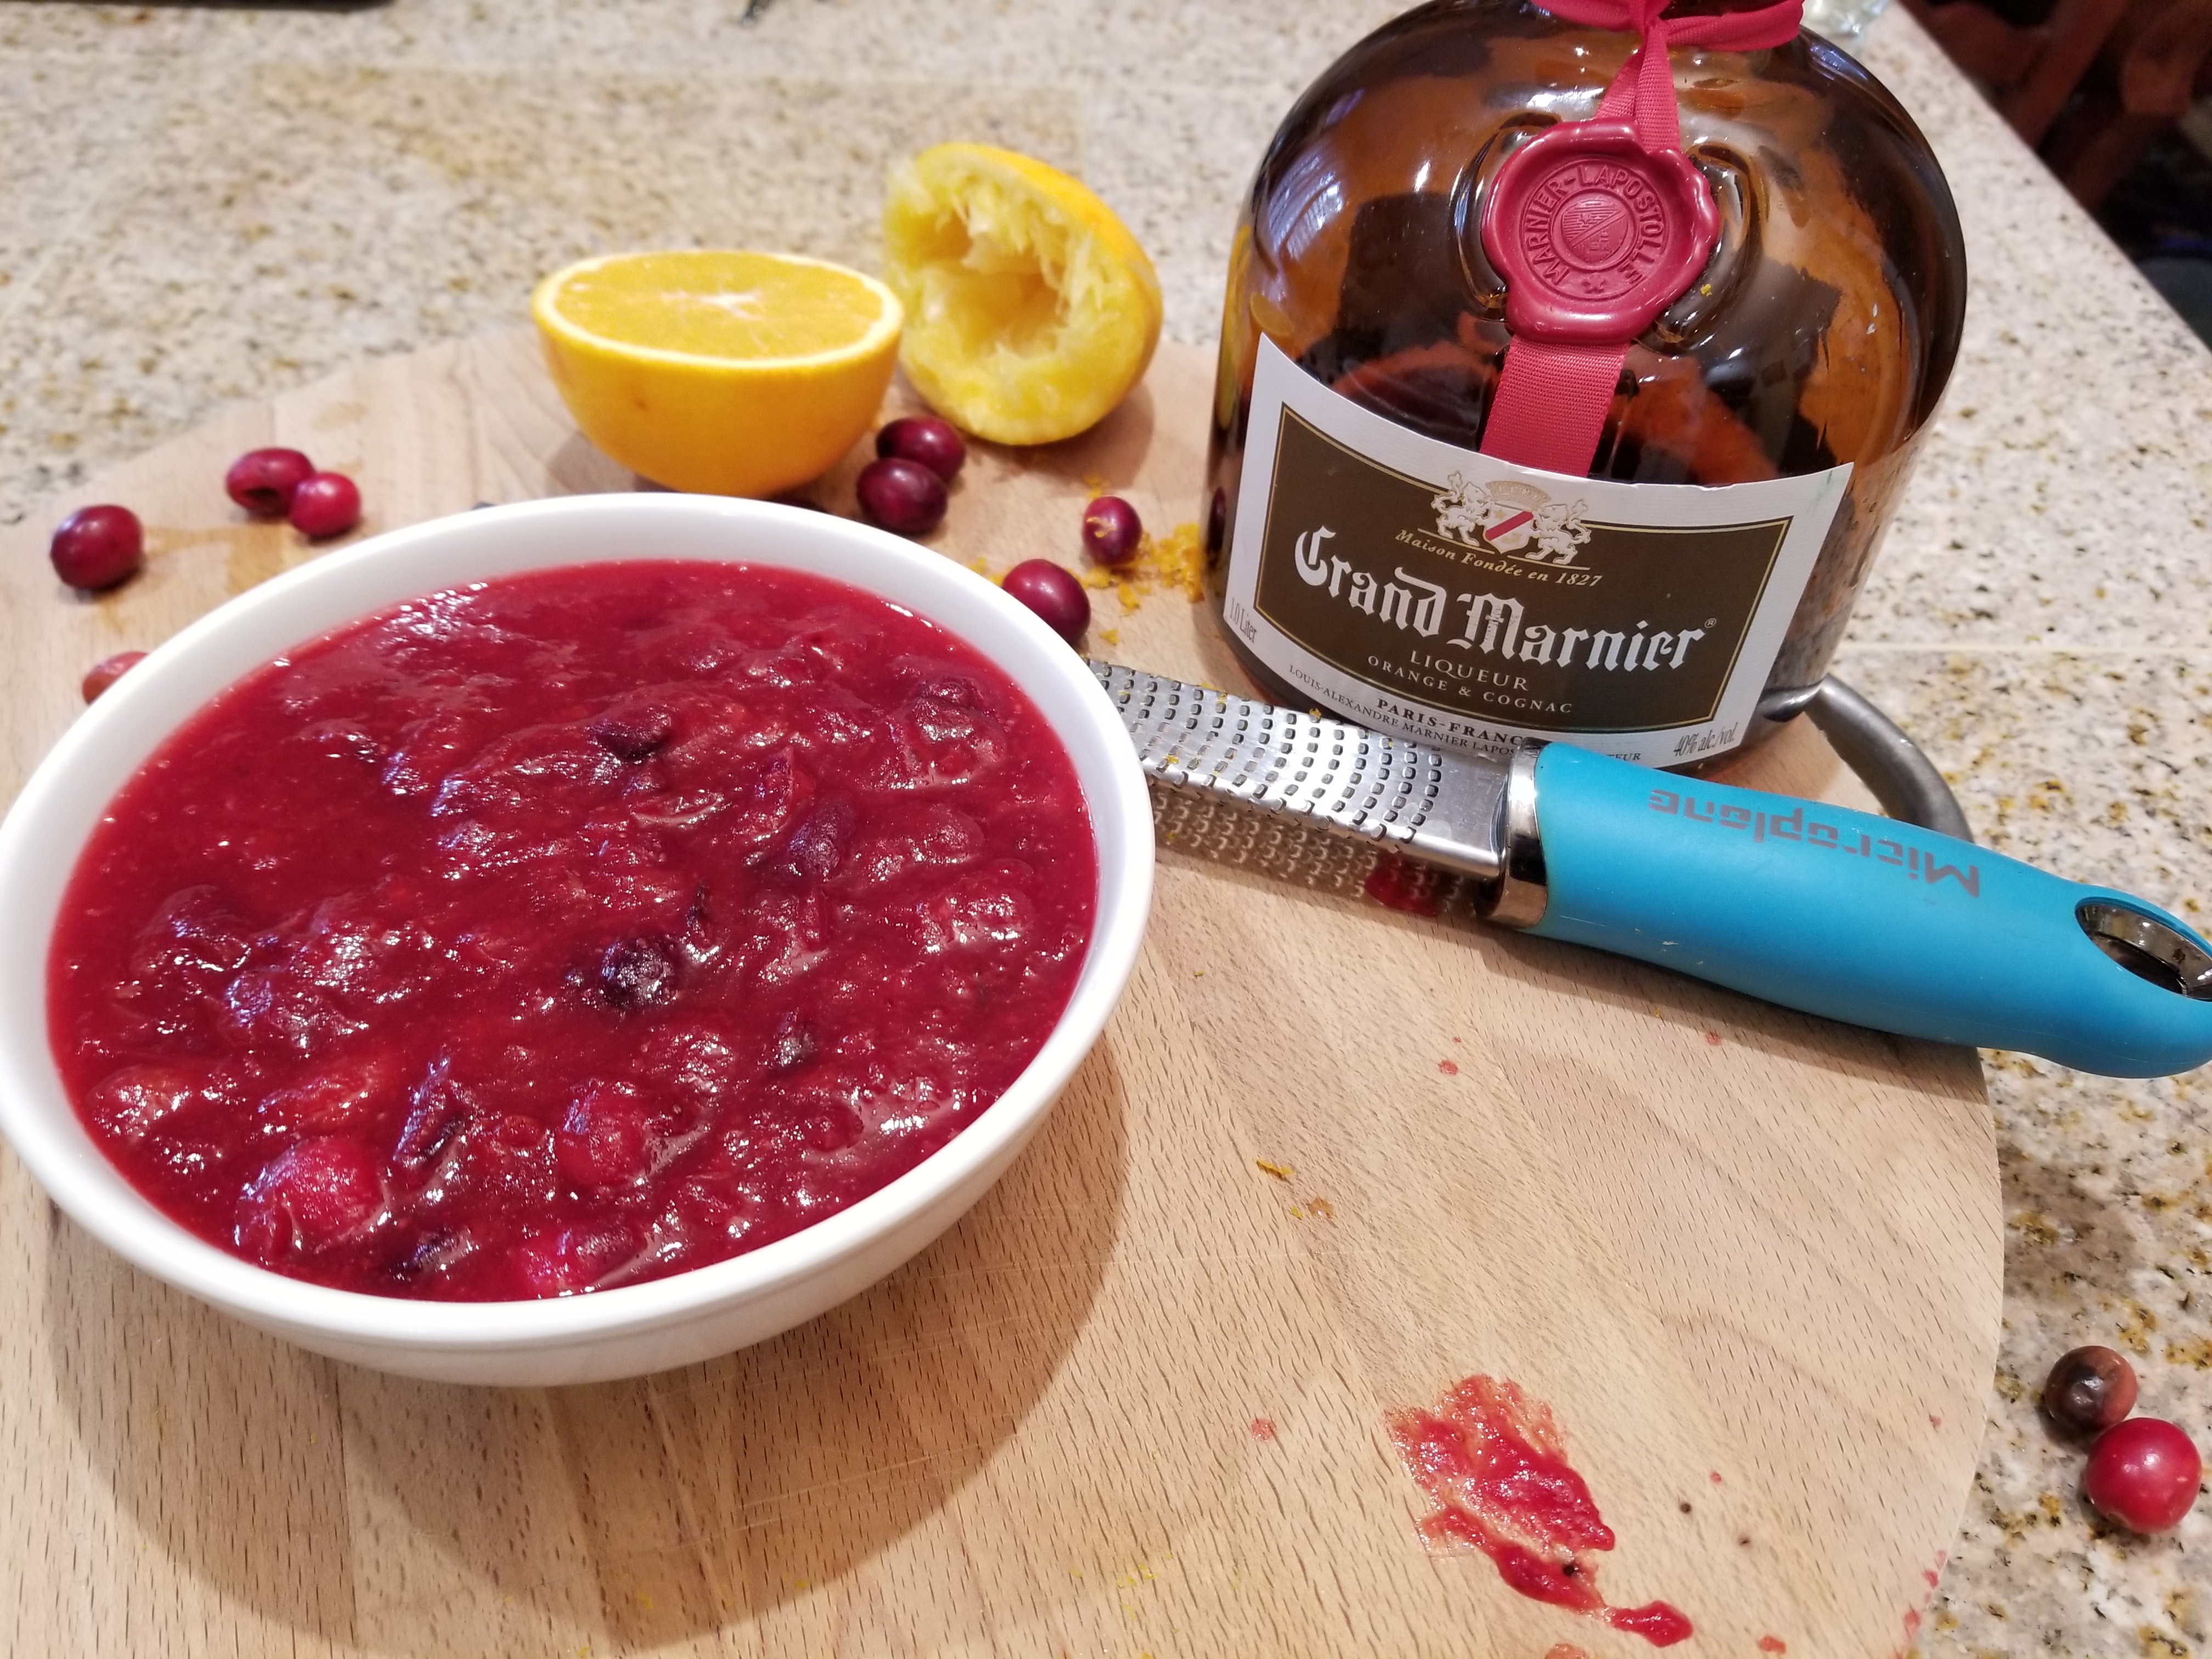
  • about 3/4 cup cranberry chutney
  • 8 oz of goat cheese
  • 2 hand fulls of arugula

Instructions

Preheat oven to 375 degrees.

Flour your work surface and roll out the puff pastry sheet until it’s about 2 inches wider on each side.

Use parchment paper or aluminum foil to cover a sheet pan for easy clean up later, but totally not necessary. The puff pastry has enough butter on it’s own that it wont stick to the pan.

Before adding toppings, put the rolled out pastry sheet on the sheet pan. Something I didn’t do and it was not fun to move after it had all the toppings.

Spread the cranberry chutney on top, leaving a one-inch border.

Top with pieces of crumbled goat cheese.

Bake in the preheated oven for about 20-25 minutes or until the edges are golden brown.

As soon as you take it out of the oven, top with the arugula. I love having the arugula warm up and wilt a little before serving.

Let rest for about 5-10 minutes before serving. Just that easy!

Variations:

  • make them into bite-sized hors d’ oeuvres. After adding the goat cheese, add the arugula and roll as tight as you can. Cut into 1-1.5″ pieces, lay them flat, and bake on a baking sheet. The oven temperature and time area about the same as the whole tart.
  • Use mango chutney instead of cranberry.
  • Use Feat cheese instead of goat cheese.
  • Add chopped walnuts or pine nuts.

Do Ahead:

  • Assemble up to the point of baking. Wrap with saran wrap and refrigerate up to one day ahead.

12 Easy, Eye-catching, Almost Homemade Desserts

1– I get invited to a potluck
2 – I come up with these amazing, elaborate ideas and I have no doubt that I will have time to do it all. I just have to write a list of what I can get done ahead of time so I don’t have to rush last minute, I tell myself.
3 – List doesn’t get done because, Darn it! I have so much going on!
4 – I get frustrated and annoyed with myself because why don’t I ever learn? So I try to figure out what else I can make that would take less time.
5 – It’s the day of the potluck, I have no list, and no time to make that fabulous thinigiemajig that I saw on Pinterest that was suppose to take less time.
6 – Last resort…go to the store and get something ready-made. Sigh…

Sound familiar? Well, I am here to show you 12 or more easy ideas for how to dress up your store-bought desserts to make them look amazing and elaborate without spending all day in the kitchen or washing a ton of dishes. And everyone at the party will think you are so gourmet. Which you are because you like my blog. You’re welcome!

To make your life a little easier, I have included a list, along with Amazon links, of the products I used. The “Display/Plating” items may not be exactly like the ones I use, but similar. please see product links at the end of this blog.

Brownie Bite with Fluer De Sel Course Sea Salt
Would also be delicious with caramel instead of chocolate sauce
Brownie Bite Santa Hat
Brownie Bite with raspberry coulis, Raspberry, & whipped cream
Chocolate Pudding Cups with Peppermint
Lemon & Raspberry Mini Tarts
Cranberry Chutney with Whipped Cream and mint, Lemon Curd, Whipped Cream, & Fresh Raspberry,
Chocolate Pudding with Whipped Cream and Chocolate-covered Espresso Bean

Brownie Bite with Whipped Cream & Topped with Rice Krispies
Brownie Bites with
Whipped Cream and Chocolate Covered Espresso Beans
Chocolate Sauce and Fluer De Sel Sea Salt
Whipped Cream & Chopped Pistachios
Brownie Bite with Raspberry Coulis, Whipped Cream, & Sliced Almonds
Pound Cake with Raspberry Coulis, Whipped Cream, & Fresh Berries
Chocolate Pudding Cup with Whipped Cream & Crushed Toffee

Here are the list of items that I used for all the different ideas:

  • Filo (or Phyllo) cups
  • Brownie Bites
  • Plain or Lemon Pound Cake
  • Lemon Curd
  • Chocolate Pudding
  • Sliced Almonds
  • Pistachios
  • Fresh Berries
  • mint
  • Chocolate Sauce
  • Caramel Sauce
  • fluer De Sel
  • Candy Cane
  • Rice Krispies
  • Cranberry Chutney
  • Homemade Cranberry Sauce (click here to watch a quick video on how to make your own cranberry sauce.)
  • Whipping Cream
  • Toffee Bar
  • Chocolate Covered Espresso Beans
  • Valrhona Chocolate

Display/Plating

  • Small White Square Plates
  • White Rectangular Plates
  • Asian Style Soup Spoons
  • Wood Platter
  • Cosmopolitan Glasses
  • Chocolate Shaver
Lemon Pound Cake & Fresh Raspberry Trifle
Make layers with pound cake, fresh raspberries, & whipped cream. 
Top with mint leaf and a little of the pond cake crumbled as garnish,
Lemon Pound Cake & Fresh Raspberry Trifle
Make layers with pound cake, fresh raspberries, & whipped cream.
Top with mint leaf and a little of the pond cake crumbled as garnish,

Cranberry Sauce

This is so easy you will never want to buy another can of cranberry sauce!

Variations:

  • Add spices like cloves, cinnamon, or ginger.
  • Add fresh herbs like thyme or rosemary while it’s cooking
  • Use cranberry sauce on chicken, duck, pound cake, ice cream…
  • Making a leftover turkey salad? Add some cranberry sauce to the mix, with some nuts and celery.

Do Ahead:

The sauce can be made 5 days ahead of time. Keep refrigerated. You may need to add a little liquid when reheating.


Roasted Kabocha Squash & Black Bean Tacos with Chili-Lime Crema

If you’ve never had this underrated squash, I recommend you give it a try. Kabocha squash is available year-round, but is at its best in late Summer and early Fall. The flavor is slightly sweet and has the same texture as butternut squash. It’s rich with vitamin A that is good for immunity, eyes, skin, hair, and healthy white blood cells. It’s also is a good source of iron.

The hardest part about this recipe is cutting and peeling the Kobocha, also known as a Japanese pumpkin. But here is a trick. Cut it in half and microwave for about 2-3 minutes. This will help soften the skin, therefore easier to peel. All else fails, leave the skin on. It is actually edible.

IMG_0766

Serves 3-4    Difficulty level – easy peasy

  • ½ medium Kabocha – about 1-1.5 pounds
  • 2 tablespoons olive oil
  • sea salt and freshly ground pepper
  • 1 can black beans, drained and rinsed
  • 1 tablespoon ground cumin
  • ½ cup roughly chopped cilantro
  • 1/3 cup diced or thinly sliced red onion
  • 1 cup shredded Romaine lettuce
  • ½ cup crumbled feta cheese
  • 1 avocado sliced for topping
  • 1 lime cut into wedges

For the chili-lime crema

  • ½ cup sour cream
  • ½ teaspoon cayenne pepper (less if you don’t like it spicy, more if you do)
  • zest of 1 lime
  • 1 teaspoon lime juice
  • ¼ teaspoon salt

Preheat oven to 425°. Start by cutting the ends off. Then cut in half, seed, and peel.

Chop the Kabocha into small cube-ish pieces – about ½” x ½”. The shape doesn’t matter so much, as long as they are about the same size so they will cook evenly.

Toss with 2 tablespoons of olive oil, salt, and pepper. (Note: You can roast the whole squash and save half for snacks, to put in a salad, or soup.) Roast in the oven until soft and slightly brown about 20-25 minutes.

IMG_1219

In the meantime, mix the black beans, ground cumin, about ¾ of the red onion, and cilantro in a medium bowl. Once the squash is cooked, add to the bean mixture and toss to coat.

Warm the tortillas on a griddle pan and keep warm by wrapping in aluminum foil, kitchen towel, or tortilla warmer if you have one.

To make the chili-lime crema, mix all the ingredients together. Set aside.

Put the lettuce, extra chopped onion, feta, avocado, chili-lime crema, and lime wedges on a platter for self-serving. Serve the squash and bean mixture, along with the condiments and warm tortillas.

IMG_1225

Variations:

  • Make it lighter and use non-fat Greek yogurt instead of sour cream.
  • Make it low carb and add all the condiments to the squash mixture and turn it into a salad.
  • Use other winter squash or sweet potatoes instead of Kabocha.
  • Use other kinds of beans like pinto, white beans, or kidney beans.
  • Add some cooked rice to the squash and bean mixture.
  • Add black olives to the squash and bean mixture.
  • Make it a tostada by keeping the tortillas on the griddle until crisp.
  • Make it into enchiladas by adding some cheese, rolling them up, putting them in a baking dish, adding enchilada sauce on bottom and top, with some cheese, and baking them at 375° for 20 minutes.

IMG_1232

Do Ahead:

  • Kabocha squash can be roasted 5 days ahead. Keep refrigerated.
  • The mixture can be make 1 day ahead. Keep refrigerated and reheat in a pan on the stove or in microwave.


Edamame & Kale Quiche

When you mention quiche, most people probably think brunch or tea party. Personally, I like to eat quiche any time of day. Breakfast? Of course. Lunch? Yum. Dinner? You got it. Snack? Bring it on! It’s also great for picnics and potlucks. You can even cut it into bite-sized pieces and serve as an appetizer. Is there anything a quiche can’t do? I think not!

Technically you should blind bake the dough partially, but oops! I forgot when I was doing my video. I was going to remake it and redo the video, but when I baked it, it was still pretty great! The egg part wasn’t overcooked even after letting the dough get nice and brown.

I still say for a perfect quiche – like if you were entering into a quiche-making contest or something – blind bake the dough partially. But I’ll leave it up to you. I wonder what I will do next time I bake one…

Serves 4-6          Difficulty Level: Intermediate

Ingredients:

  • 1.5 cups edamame
  • 1.5 cups kale, chopped and blanched (Click here to see a video on how to blanch)
  • 2 Tablespoons fresh tarragon, roughly chopped
  • 4 eggs
  • 2 cups half & half
  • ½ teaspoon sea salt for vegetable mixture, 1 teaspoon for egg mixture
  • ¼ teaspoon fresh ground black pepper for each mixture
  • 8 ounces goat cheese
  • 1 pie dough for 9” pie, homemade or store bought
  • sour cream or yogurt for garnish – optional

Instructions:

Preheat oven to 350°. Cook the edamame until it’s soft, but still has some texture or is al dente.

Blanch the chopped kale until bright green, about 30-40 seconds. Drain and Mix with the edamade and tarragon in a small bowl. Season with salt and pepper.

In a medium bowl, whisk the eggs with the half & half. Mix in the goat cheese, until combined but not complete incorporated. Leave some chunky pieces. Season with salt and pepper.

Roll out the pie dough to fit your pie dish. Make sure it’s large enough to come up the sides as well. Spread the edamame mixture evenly at the bottom of the dough. Then gently pour the egg mixture on top.

Bake until the crust is golden brown and the center is only slightly giggly, about one hour to one hour and 15 minutes.

Let cool for at least 15 minutes before cutting. You can serve it warm, at room temperature, or even cold. I wouldn’t necessarily plan to serve it cold, but if you came home from work late and are starving, you can grab a piece right out of the fridge and devour.

IMG_0658

Variations:

  • Skip the dough and make it a frittata. You don’t need to bake it as long, about 30-40, but still look for the slightly giggly texture in the middle. Let it cool down for the same amount of time, 15 minutes.
  • Use any combination of vegetables you like. Just stay away from things like tomatoes. It might make it too soggy. Unless you seed the tomatoes. (Click here for a video on how to peel and seed tomatoes.
  • If you are not concerned about keeping it vegetarian, add some cooked chicken, bacon, or sautéed pancetta. Yum!
  • Use different herbs like parsley, thyme, or chives or a combination.
  • For a little crunch and extra added fiber, protein, and magnesium, when your quiche (or frittata) is halfway cooked, sprinkle some pumpkin seeds on top.
  • Use other kinds of cheese like Gruyere, Brie, Parmigiano Reggiano, feta, Gouda, or Havarti.
  • Cut into bite-sized pieces and serve as an appetizer.

IMG_0681

 Do Ahead:

  • The fully cooked quiche can be kept in the refrigerator for up to 5 days.
  • If making the dough yourself, you can keep it in the refrigerator for up to 5 days, or freeze for up to 3 months.
  • The vegetables can be cooked/blanched up to 3 days ahead.
  • The egg mixture, along with the vegetables, can be made a day ahead.