Mediterranean – Tuna Salad #14

I am working on a collection of recipes using canned tun fish. This is recipe #14.

The whole idea came to me years ago when I was trying to put together easy and inexpensive recipes for students going off to college. The finished product was meant to be a cookbook. I went as far as writing down 45-50 recipe ideas using canned tuna fish. Then life happened. I put the list away and didn’t think about it. But about 2-3 years ago, as I was unpacking a box I had in storage, I came across the list! I laughed to myself for my silly idea and threw it away.

Now it’s 2020. We are in quarantine, socially distancing, trying to limit our trips to the grocery store, eating at home more, and trying, probably more than ever, to stay on a budget since none of us knows what’s going to happen next.

And so the 50 canned tuna recipes idea came rushing back to me. I had thrown away my list but I found it pretty easy to start writing down ideas. Because really, tuna is so versatile, but for most of us, the go-to is mayo, celery, and onion. I’m not knocking it. It’s very delicious and I still use that combination all the time, but there are so many other variations. Let me count the ways…

Wondering where are recipes #1-#13 and #15-#50? If they are not already on my blog, it means they’ll be coming soon. The recipe numbers are correlated with my notes when I started writing down ideas. The order in which I post them has to do with what I have at home and what I’m in the mood to taste test that day. I know, very scientific.

Tuna, feta cheese, kalamata olives, green onions, lemon, capers

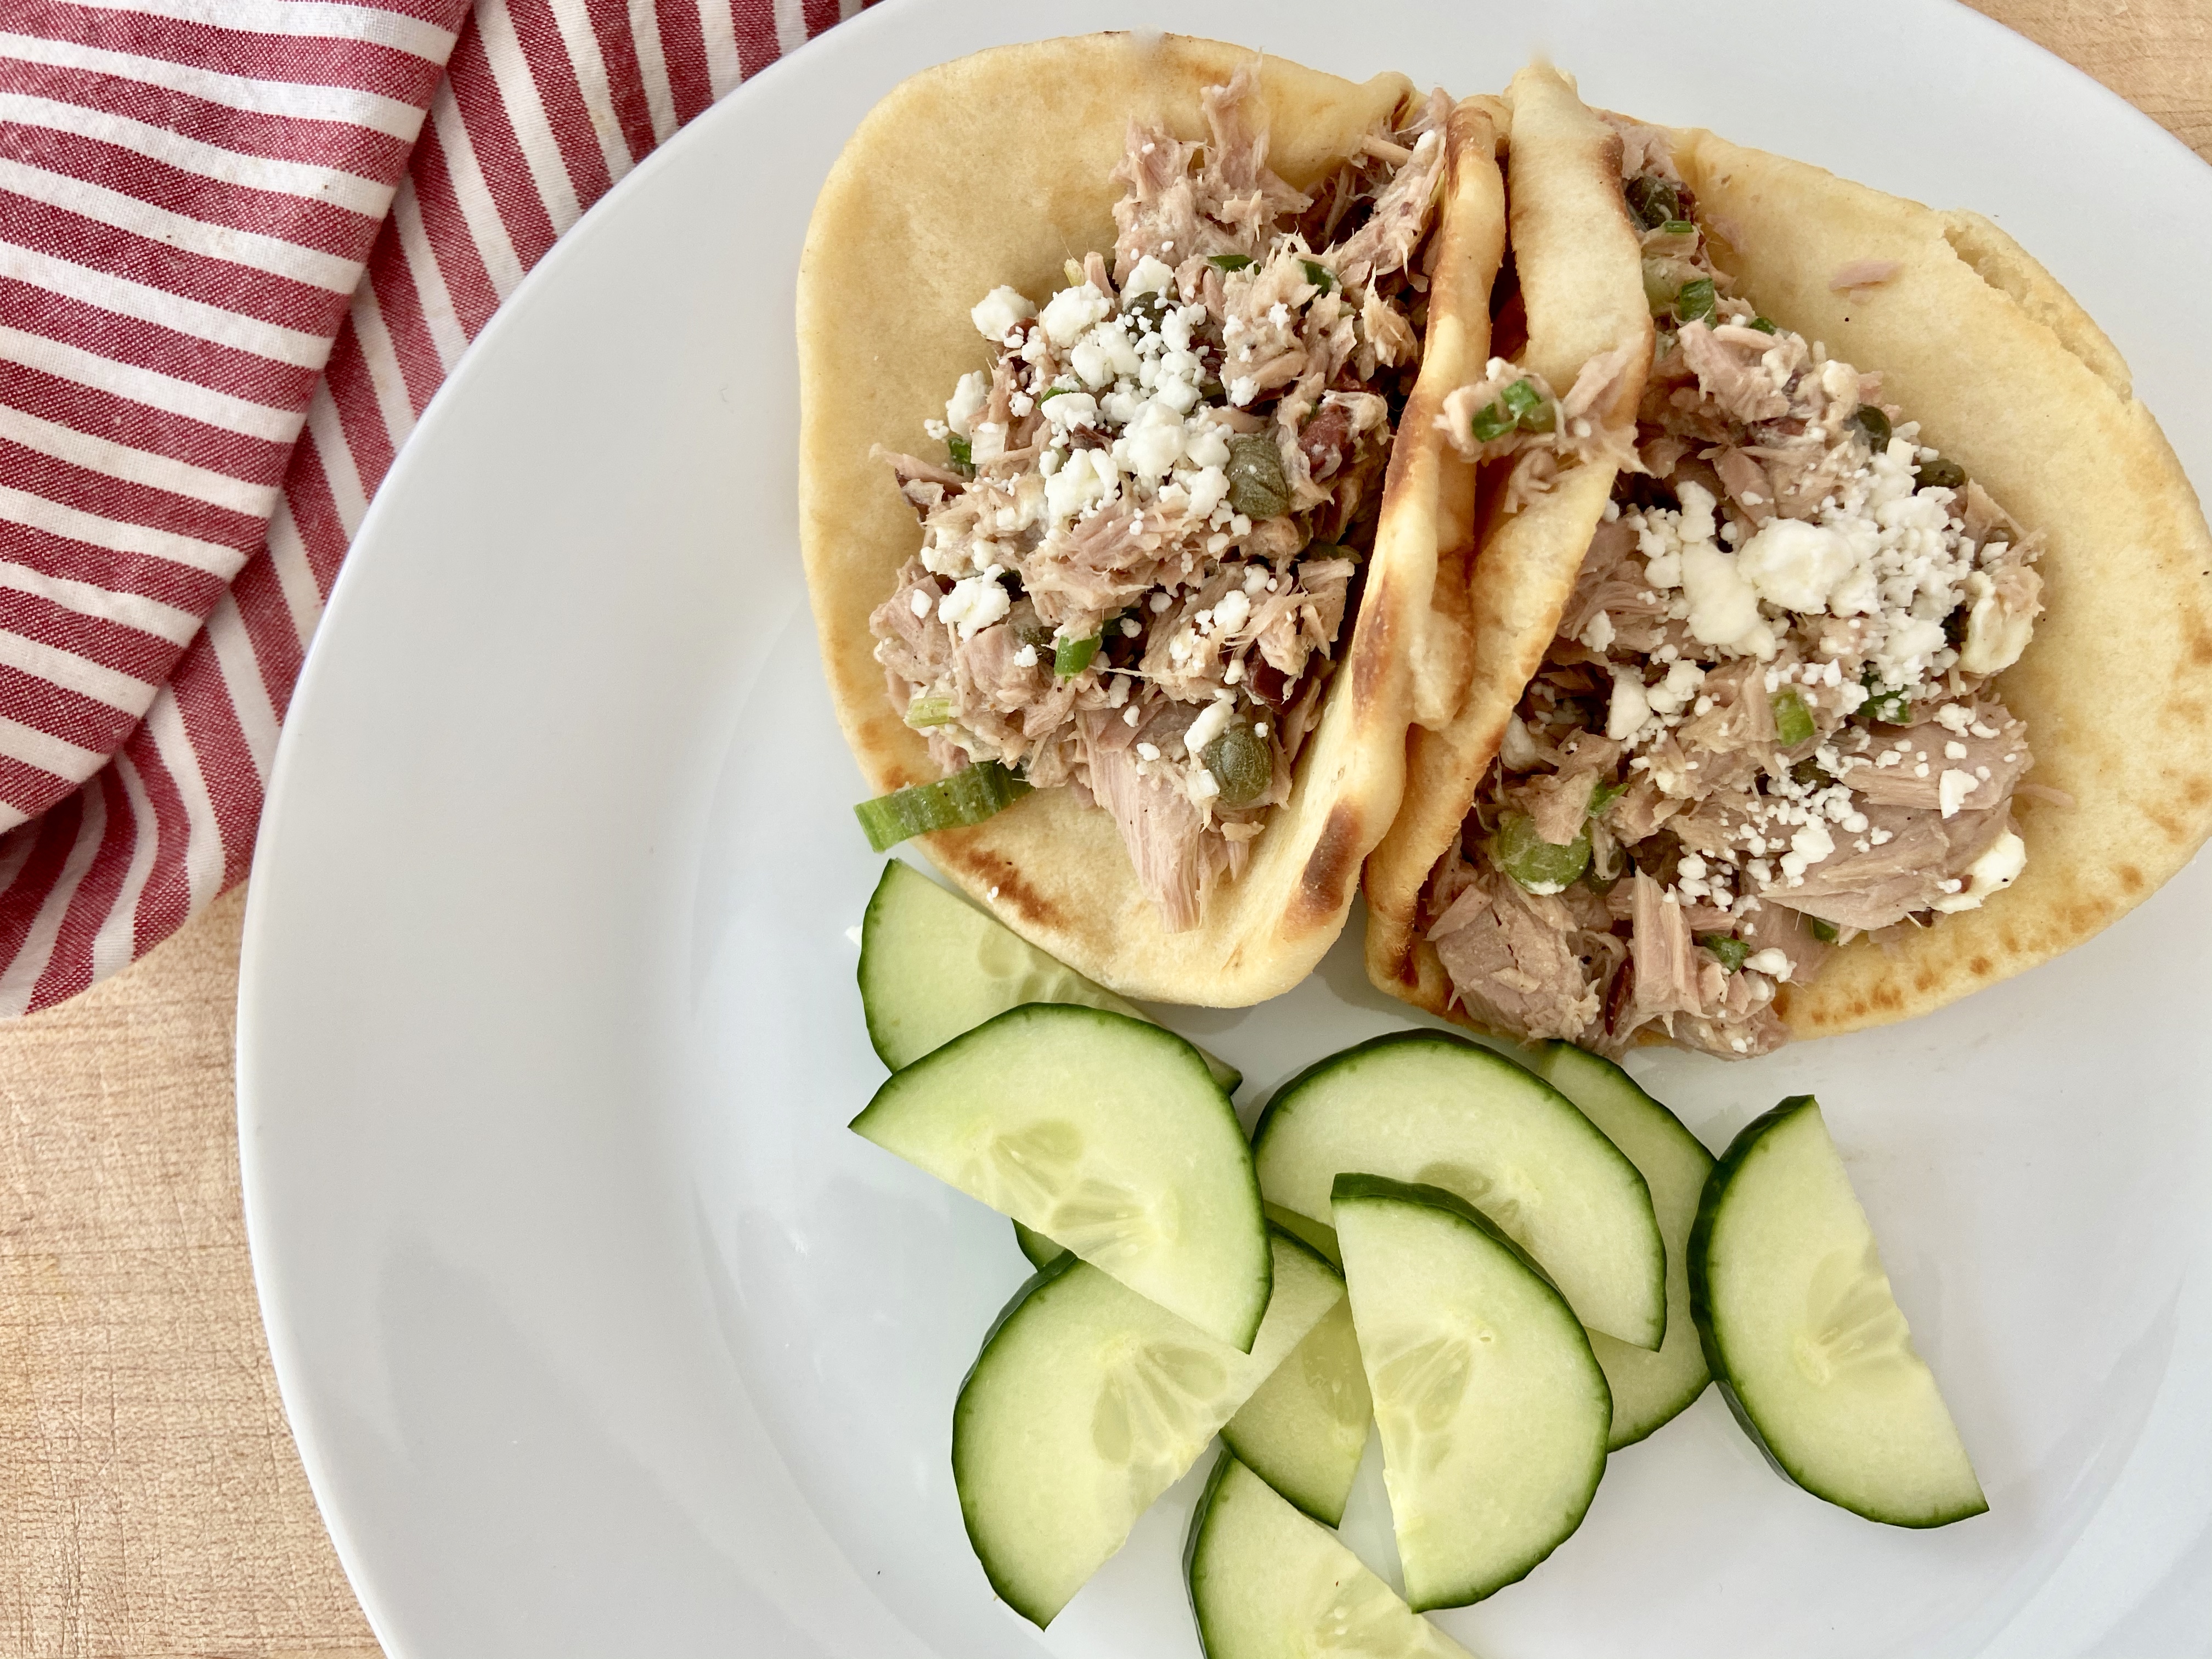
This Mediterranean version is a great combination of salty and sour, and on the lighter side because there is no mayo. Feta cheese, olives, and capers are naturally salty. And since olives and capers are usually in a brine, they are also slightly sour, and of course a squeeze of lemon brings it all together. Don’t worry about using exact measurements for these recipes. Adjust the ingredients to your taste.

Serves: 2

Difficulty level: Easy peasy

Ingredients:

  • 1 can of tuna – your favorite brand
  • 1 Tablespoon crumbled feta cheese
  • 3-4 Kalamata olives, chopped
  • 1 green onion, sliced thinly
  • a squeeze of lemon
  • 1 tablespoon capers – Capers come in a jar at the grocery store, usually in the same aisle as olives and pickles.
  • drizzle of olive oil
  • freshly ground black pepper to taste

Instructions:

Drain the tuna (Unless it’s packed in olive oil, then don’t drain). Put in a bowl with the rest of the ingredients and mix.

Use your favorite bread to make a sandwich or toss with some lettuce for a carb-free option.

Mediterranean Tuna Salad with Naan

Chicken Tortilla Soup from Your Pantry

I honestly don’t even know if I have ever ordered a chicken tortilla soup at a restaurant, so I just had a vague idea of the ingredients when I started this recipe. But after I got started, I realized it was pretty easy to bring it all together.

Once you try it, I promise it will become one of your go-to recipes for a quick meal that’s hearty, comforting, and healthy. It is loaded with protein (Yes, even the vegetarian version.), fiber, and so many other vitamins and minerals. It has vitamin C, an essential nutrient and antioxidant, potassium that is good for heart disease prevention and blood pressure control, and magnesium; A mineral crucial to body’s function. Like potassium, it keeps blood pressure normal, and also keeps bones strong and heart rhythm steady.

The best part about this recipe is that it’s mostly made with canned goods from your pantry. For ideas on how to have a well-stocked pantry check out my list.

You can watch the full step-by-step video here. Or you can follow the instructions below.

Serves 4-6

Difficulty Level: easy peasy

Ingredients:

  • 1 tablespoon olive oil
  • 1 medium onion, chopped
  • 2 cloves of garlic, chopped
  • 2 tablespoons ground cumin
  • 1 can of chopped, pureed, or whole tomatoes
  • 3 cans of chicken or vegetable stock
  • 1 can of corn, drained
  • 1 can black beans, drained, but not rinsed
  • about 1.5 cups shredded chicken
  • Sea salt and freshly ground black pepper as needed
  • for garnish: tortilla chips or strips, avocado, sour cream, sliced green onions, jalapeños, cilantro, lime wedges

Instructions:

Heat a large stock pot on medium-high heat. Once the pot is hot enough that you can barely touch the sides, add the olive oil.

Add the chopped onions and garlic and sauté until translucent.

Note: I didn’t use fresh garlic in this demo because the jarred tomatoes I was using already had garlic.

Add the cumin and sauté for another minute. Add the tomatoes with the juices from the can, the chicken or vegetable stock, and cook until it comes to a boil.

Once it comes to a boil, turn down the heat to medium-low and using an emersion blender or a Vitamix, puree the soup until smooth and no chunks are left behind.

Turn up the heat back to medium-high and add the corn, black beans, and shredded chicken.

Stir to combine and taste for seasoning. You may not need to add any salt since most of the ingredients are from cans and the pre-roasted chicken is already seasoned.

Adjust seasoning as necessary. Garnish with your favorite toppings and serve immediately.

Variations:

  • Make it vegetarian by using vegetable stock and not adding the shredded chicken.
  • When tomatoes are in season – July to September – use fresh instead of canned
  • Add other favorite canned beans like pinto or garbanzo beans
  • Although not traditional, you can make it creamy by adding 1/4 cup of whipping cream or creme fraiche.
  • Make it into a tomato-basil soup! After pureeing, add some pesto sauce. Start with 1 tablespoon. You can always add more. Omit the corn and the beans. Add chicken and garnish with small fresh mozzarella balls.

Do Ahead:

This recipe is easy and quick enough that there is not really a need for do ahead tips. But if you do have leftovers, I can tell you that it will taste even better the next day. It also freezes very well.

If you are making the soup before you intend to eat it, I would leave it at the pureed stage and not add the rest of the ingredients. When ready to eat, bring the pureed soup to a boil, then add the corn, beans, and chicken. Adjust seasoning and enjoy!


Basic Herbed Focaccia Bread

Learning to make focaccia bread is a great way to get started in your bread-making adventure. It has less fuss and muss compared to making for example a baguette. And you still get the satisfaction of enjoying warm, fresh-baked bread right out of the oven. What’s better than that?

The ingredients are simple and mostly from your pantry.

You can watch the full step-by-step video here

Or you can follow the instructions below.

Makes 1 Focaccia

Difficulty Level: medium

Ingredients

  • 1 packet or 1 tablespoon Active Dry yeast
  • 1 Tablespoon sugar
  • 1 cup warm water about 110-115 degrees
  • 3 large garlic cloves, minced
  • 2 teaspoons dried thyme
  • 1/4 cup olive oil (plus another 1/4 cup more for coating the dough while rising and for drizzling on top)
  • 1 teaspoon fine sea salt
  • 3 1/2 cups all-purpose flour or bread flour
  • 1 Tablespoons coarse sea salt for topping

Instructions

Proof the yeast by stirring together the yeast, sugar, and warm water in the bowl of an electric mixer. If you don’t have a mixer, no worries. Just mix the ingredients in a glass or stainless steel bowl.

Let sit for about 10 minutes or until fluffy. This step insures that your yeast is active.

Quick tip: Store your yeast in the freezer. It will last longer than its expiration date, but you should still proof it to make sure it’s active.

Add in the thyme, minced garlic, 1/4 cup of olive oil, sea salt, and flour.

Quick tip: The ratio for fresh herbs versus dried herbs is 3:1. So if I was using fresh thyme I would need 6 teaspoons, (equal to 3 tablespoons) instead of 2 teaspoons.

Using the dough hook on your mixer, mix the ingredients on low until the dough starts to come together, about 2-3 minutes.

Increase the speed to medium and mix until the dough comes away from the sides of the bowl, about another 5-6 minutes or until the dough is elastic and will not tear easily when pulled. If kneading by hand, it will take about 10-12 minutes of kneading time.

Drizzle about 1 tablespoon of olive oil on top of dough and turn to cover all sides . Cover the bowl with plastic wrap and place in a warm, draft free place until the dough doubles in size, about 1 1/2 hours.

Punch down the dough to redistribute the yeast. “Punch down” is just a term used; don’t take it literally. Instead, gently fold over the dough and press down a few times.

Grease a half baking sheet pan (17 by 12-inch) and transfer the dough onto the baking sheet. I like to make a rustic shape in the middle, leaving a few inches off each side. This will give me enough thickness after it’s baked to cut in half and make a sandwich. You can also stretch the dough to fit the pan for a thinner finished bread.

Lightly cover the pan with plastic wrap and let the dough rest for 1 hour. Start preheating the oven to 350 degrees Fahrenheit half way through this resting period.

Now is the fun part! With your fingertips, press down on the dough to make little indents. I love this part!

Drizzle or brush the top with olive oil and sprinkle generously with the coarse sea salt.

Bake for 25 to 30 minutes or until the crust is golden brown . Enjoy!

Herbed Focaccia bread with olive oil/balsamic vinegar dipping sauce

Variations:

  • I used dried thyme because it was what I had on hand, but you can substitute with fresh herbs such as rosemary, a very classic herb for focaccia. You can use pretty much any herb you like. See the “quick note” above regarding the ratio of fresh versus dried herbs.
  • Add raisins or other dried fruit to the dough.
  • Top with caramelized onions
  • Mix in about 1/4 cup roughly chopped Kalamata olives in the dough, and about 1/4 cup sprinkled on top
  • Drizzle truffle oil on top
Fresh Rosemary Focaccia
Clockwise from left: Herb de Provence cream cheese with fresh tomato slice, Turkey Sandwich with tomatoes, onions, & Spring mix, Salami and Havarti Cheese Sandwich
With pesto and balsamic dipping sauce

Do Ahead:

There isn’t much you can do ahead of time for this one. But, you can slow down the rising process of the dough by putting it in the refrigerator. This will slow it down by 2-3 hours.


Cranberry & Goat Cheese Tart

I was invited to an outdoor potluck picnic in the Santa Cruz mountains a couple of weeks ago. The spot was so beautiful and rustic with tall trees and an ocean view in the distance. Gorgeous!

I wanted to bring something delicious of course, but also something to match the rustic atmosphere. Also I didn’t want something that needed to be heated or kept cold. So I looked in my refrigerator to see what I had on hand and decided on this cranberry and goat cheese tart.

The flavor combinations of this tart are so complex – sweet from the cranberry chutney, tangy from the goat cheese, and peppery from the arugula on a crispy, flaky puff pasty dough – it’s hard to believe how easy it is to make. And with only 4 ingredients! (If you don’t count the flour for the work surface.)

Serves: 4-6 as an appetizer

Difficulty Level: So easy

Ingredients

  • 1 sheet puff pastry
  • about 3/4 cup cranberry chutney
  • 8 oz of goat cheese
  • 2 hand fulls of arugula

Instructions

Preheat oven to 375 degrees.

Flour your work surface and roll out the puff pastry sheet until it’s about 2 inches wider on each side.

Use parchment paper or aluminum foil to cover a sheet pan for easy clean up later, but totally not necessary. The puff pastry has enough butter on it’s own that it wont stick to the pan.

Before adding toppings, put the rolled out pastry sheet on the sheet pan. Something I didn’t do and it was not fun to move after it had all the toppings.

Spread the cranberry chutney on top, leaving a one-inch border.

Top with pieces of crumbled goat cheese.

Bake in the preheated oven for about 20-25 minutes or until the edges are golden brown.

As soon as you take it out of the oven, top with the arugula. I love having the arugula warm up and wilt a little before serving.

Let rest for about 5-10 minutes before serving. Just that easy!

Variations:

  • make them into bite-sized hors d’ oeuvres. After adding the goat cheese, add the arugula and roll as tight as you can. Cut into 1-1.5″ pieces, lay them flat, and bake on a baking sheet. The oven temperature and time area about the same as the whole tart.
  • Use mango chutney instead of cranberry.
  • Use Feat cheese instead of goat cheese.
  • Add chopped walnuts or pine nuts.

Do Ahead:

  • Assemble up to the point of baking. Wrap with saran wrap and refrigerate up to one day ahead.

12 Easy, Eye-catching, Almost Homemade Desserts

1– I get invited to a potluck
2 – I come up with these amazing, elaborate ideas and I have no doubt that I will have time to do it all. I just have to write a list of what I can get done ahead of time so I don’t have to rush last minute, I tell myself.
3 – List doesn’t get done because, Darn it! I have so much going on!
4 – I get frustrated and annoyed with myself because why don’t I ever learn? So I try to figure out what else I can make that would take less time.
5 – It’s the day of the potluck, I have no list, and no time to make that fabulous thinigiemajig that I saw on Pinterest that was suppose to take less time.
6 – Last resort…go to the store and get something ready-made. Sigh…

Sound familiar? Well, I am here to show you 12 or more easy ideas for how to dress up your store-bought desserts to make them look amazing and elaborate without spending all day in the kitchen or washing a ton of dishes. And everyone at the party will think you are so gourmet. Which you are because you like my blog. You’re welcome!

To make your life a little easier, I have included a list, along with Amazon links, of the products I used. The “Display/Plating” items may not be exactly like the ones I use, but similar. please see product links at the end of this blog.

Brownie Bite with Fluer De Sel Course Sea Salt
Would also be delicious with caramel instead of chocolate sauce
Brownie Bite Santa Hat
Brownie Bite with raspberry coulis, Raspberry, & whipped cream
Chocolate Pudding Cups with Peppermint
Lemon & Raspberry Mini Tarts
Cranberry Chutney with Whipped Cream and mint, Lemon Curd, Whipped Cream, & Fresh Raspberry,
Chocolate Pudding with Whipped Cream and Chocolate-covered Espresso Bean

Brownie Bite with Whipped Cream & Topped with Rice Krispies
Brownie Bites with
Whipped Cream and Chocolate Covered Espresso Beans
Chocolate Sauce and Fluer De Sel Sea Salt
Whipped Cream & Chopped Pistachios
Brownie Bite with Raspberry Coulis, Whipped Cream, & Sliced Almonds
Pound Cake with Raspberry Coulis, Whipped Cream, & Fresh Berries
Chocolate Pudding Cup with Whipped Cream & Crushed Toffee

Here are the list of items that I used for all the different ideas:

  • Filo (or Phyllo) cups
  • Brownie Bites
  • Plain or Lemon Pound Cake
  • Lemon Curd
  • Chocolate Pudding
  • Sliced Almonds
  • Pistachios
  • Fresh Berries
  • mint
  • Chocolate Sauce
  • Caramel Sauce
  • fluer De Sel
  • Candy Cane
  • Rice Krispies
  • Cranberry Chutney
  • Homemade Cranberry Sauce (click here to watch a quick video on how to make your own cranberry sauce.)
  • Whipping Cream
  • Toffee Bar
  • Chocolate Covered Espresso Beans
  • Valrhona Chocolate

Display/Plating

  • Small White Square Plates
  • White Rectangular Plates
  • Asian Style Soup Spoons
  • Wood Platter
  • Cosmopolitan Glasses
  • Chocolate Shaver
Lemon Pound Cake & Fresh Raspberry Trifle
Make layers with pound cake, fresh raspberries, & whipped cream. 
Top with mint leaf and a little of the pond cake crumbled as garnish,
Lemon Pound Cake & Fresh Raspberry Trifle
Make layers with pound cake, fresh raspberries, & whipped cream.
Top with mint leaf and a little of the pond cake crumbled as garnish,